Lemon Macadamia Biscuits

First of all, can I just welcome myself back to this blog?

I’ve been absent for a long while, for various reasons, but I’ve come back!

So to celebrate my return here is a cracker of a recipe for all you low-carb fiends like myself – one that is guaranteed to convert any doubters of this diet!

Talking with some people recently about low-carb baking, the overwhelming question seems to be “Do things still taste good?” and my answer is always “Yes!” – and this recipe is a great way of proving that.

I love anything to do with lemons, and how can you go wrong with lemon and macadamias?!

biscuits-2-edit3-web

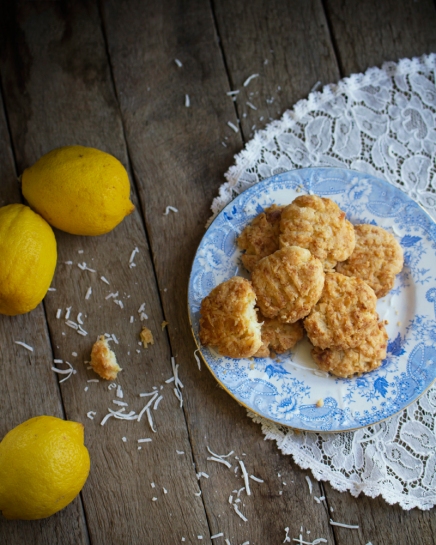
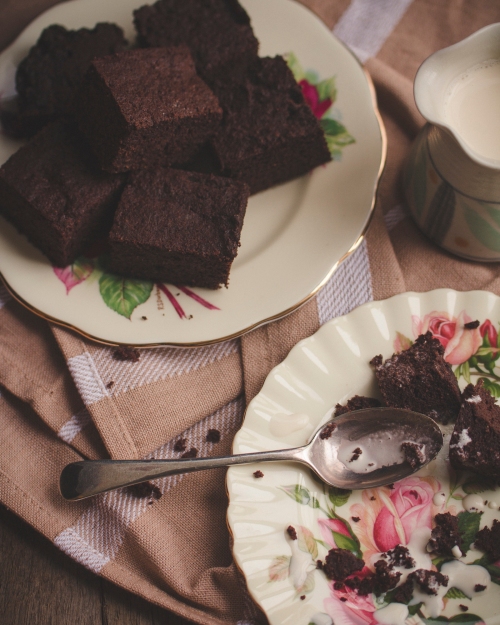
This is also the first non-chocolate recipe I’ve shared on here, so there you go.

I based this recipe on Julia McPhee’s Low Carb Almond Coconut Cookies and really all I did was just narrow down the range of flavours. The recipe provides a great base for different kinds of biscuits, so have a play and see what combination is your favourite – you could try walnuts instead of macadamias, add some sugar free chocolate chips, or take out the extra nuts and add some fresh grated ginger instead.

These are quite crumbly but are so delicious and incredibly moreish – I could easily eat half a dozen at once.

I’ve found a 1/4 cup of coconut oil isn’t always quite enough, so I’d suggest melting that extra tablespoon and add it to the mixture if it doesn’t come together enough. What oil you don’t use can always go back in the jar for next time. And always make sure you let the coconut oil cool before you add it to the egg!!

This recipe is low-carb, grain free, gluten free, dairy free and sugar free.

Enjoy!

Lemon Macadamia Biscuits

1 cup almond meal
3/4 cup shredded coconut
1 tsp baking powder
1/4 cup + 1 tbsp coconut oil (melted)
1 egg
1/2 cup macadamias, chopped finely
1 tbsp xylitol (or other sweetener equivalent)
3 tsp lemon zest

  1. Set oven to 180C.
  2. Combine all the dry ingredients (almond meal , shredded coconut, baking powder, macadamias, xylitol and zest) in a large bowl.
  3. In a smaller bowl whisk egg and coconut oil together in a smaller bowl, then add to dry ingredients. If the mixture doesn’t hold together add the extra coconut oil. If it’s too dry, add an extra sprinkling of almond meal.
  4. Roll into balls and place on baking tray. Flatten each with a fork.
  5. Bake for around 15 minutes or until golden brown. Cool on cake rack.
  6. Eat one before someone else eats them all!!

Chocolate Fat Bombs

I promised myself that my next post would not be about chocolate – but here I am again… I swear it’s not on purpose that all my posts so far have been chocolate recipes!!

Anyway, getting to the point: chocolate is awesome. And these little mouthfuls of goodness are a great way to enjoy chocolate treats without the guilt.

Chocolate fat bombs-1 edit web

For those who haven’t come across them before, fat bombs are basically solid fat hits with some nice flavourings to make them taste good (eating coconut oil by itself is not very appetising!). They usually have a base of coconut oil or butter, or sometimes regular butter or cream cheese.

My favourite thing about fat bombs is that they are not only easy to make, but easy to modify to your own taste – I usually end up modifying every fat bomb recipe I try, until I get it tasting the way I want. Because you’re not dealing with any ingredients that need cooked, it’s simply a case of tasting as you go. I’ve tried a few different fat bomb recipes so I just took everything I knew and created this recipe out of my head. I’m sure it’s not perfect, so please take this recipe as a rough guide and feel free to comment with any changes you made.

You can melt the coconut oil well in advance if you need to, as it will stay in liquid form at room temperature for hours. I hear you can melt it in a microwave, but if you don’t have one (like me) just pop it in a small pot on a medium heat and it will melt in a matter of minutes.


Chocolate Coconut Fat Bombs

Makes at least 15 fat bombs.
Note: If you fill all the cases to the top you should get about 15 – I find ones this size too rich, and end up only eating half at a time. You can fill the cases half full to avoid this issue.

Ingredients

  • 1 cup extra virgin coconut oil (melted)
  • 1 cup cocoa powder
  • 1 tsp vanilla extract
  • 3 tbsp powdered xylitol (or sweetener of choice)
  • 1/2 cup desiccated coconut, plus extra for dusting

Directions

  1. Place the melted coconut oil in a bowl. Add the vanilla and cocoa. Mix until there are no lumps of cocoa left.
  2. Mix in the sweetener – start with a smaller amount and keep adding slowly, tasting every time, until it tastes right for your palette.
  3. Add the coconut and mix until combined.
  4. Place mini patty cases in an appropriate sized muffin tray and pour/spoon mixture into cases. The mixture will be very runny, so this could be a bit messy – but after all, what are fingers for? 🙂
  5. Place in fridge for at least 30mins before eating. After a few minutes in fridge dust with some desiccated coconut (this is optional, but I think it looks nice and adds a bit more texture on the top).

Enjoy! 🙂

Coconut Flour Brownies

Brownies-1 edit web

If you’re anything like me, you think chocolate is pretty awesome. There are many delicious ways to enjoy it and, for me, brownies are pretty up there.

Turns out that low-carb brownies may be the best thing since…well… regular brownies!

This recipe is not only sugar-free and gluten-free, it is utterly delicious – and pretty much as guilt free as it gets!

The other great thing about these brownies is they actually get better the longer it’s been since you made them (up to a point, obviously!), so if you’re making them for a particular occasion I’d recommend making them the day before.

I first found this recipe on Fawne Hanson’s website about Adrenal Fatigue but I’ve made a couple of modifications.

I added some milk to the original recipe, because without that the batter was so stiff you couldn’t mix it! If you’re a dairy-free person you can use coconut milk instead.
As mentioned in my previous post I’m not a lover of super sweet things, so you may find the amount of sweetener I’ve used is not enough for you – just depends on personal preference.
Same with the vanilla essence – some people like a lot, some people like a little, so base this on your palette.
It’s important that you let the melted coconut oil cool before you mix it with the eggs – hot oil and raw eggs don’t really agree with each other! The melting only takes a few minutes, and the cooling can sometimes take up to 15mins especially in these quantities. Melting the oil ahead of time helps speeds up the baking process.
When mixing the wet and dry ingredients together, I recommend you don’t muck about in getting them combined. You don’t have to be frantic, but coconut flour absorbs liquid very quickly and if you take too long to mix it you may find all your liquid has disappeared! If this happens just add a little more milk to help you get it all combined. Once you’ve baked with coconut flour a couple of times you get the hang of it, so if this is your first time using it don’t get too stressed.


Coconut Flour Brownies

Prep Time: 10-15mins approx.
Cook Time: 30mins

INGREDIENTS

3/4 cup coconut flour
1/4 cup almond flour
1 cup cocoa powder
1 cup coconut oil
1/3 cup powdered xylitol (or sweetener of choice)
6 eggs
1/4 cup milk (or coconut milk for dairy free)
1/2tsp-1tsp of vanilla essence

DIRECTIONS

  1. Melt the coconut oil using a small saucepan on a medium heat. Set aside to cool.
  2. Pre-heat oven to 320F (160C). Line a brownie tin with baking paper.
  3. Mix all the dry ingredients (except the sweetener) together in a large bowl. Make sure you work out all the lumps in the coconut and almond flours, otherwise you’ll end up with massive lumps in your brownies!
  4. In a separate bowl, beat the eggs then add the coconut oil (ONLY once it is cooled down from melting), milk, vanilla and sweetener. Mix until well combined and the sweetener is at least partially dissolved.
  5. Mix the wet ingredients into the dry and stir until combined.
  6. Spoon into prepared tin.
  7. Bake for 30-40mins until firm and cooked in the centre.
  8. Leave to cool before cutting.

I like to eat my brownies with cream – lots of cream!

Any comments or questions let me know below!

Enjoy! 🙂

Avocado Chocolate Mousse

As a child I had a lot of food allergies and, among other things, chocolate mousse was a definite no-no! My body struggled with dairy from day one, and it was only a few years ago that I was able to add cheese and butter to my diet (big hooary!), so a rich, dairy based chocolate mousse was out of the question.

Since I’ve been eating a low-card-high-fat (LCHF) diet I’ve been able to tolerate milk and cream as well, which has been great, so when I found this recipe at DitchThe Carbs.com I decided to give it a try!

Chocolate mousse edit-1 edit web

Having never had ordinary chocolate mousse before, I have nothing to compare this with – but it tastes pretty good to me! The avocado gives it a wonderful creamy texture. I did find it a bit rich for my stomach when I ate it by itself, but when paired with yoghurt and blueberries it is simply delightful! I imagine any kind of berries would work well, but blueberries are my personal favourite.

You can find the recipe here.

I don’t like very sweet things, so I didn’t use the full amount of sweetener that the recipe called for (only used 1tsp instead of 2tbsp). I’d suggest you blend up all the other ingredients first and then add sweetener to taste so you can get it the way you like it.
If you’re not a dairy person, I would guess that using coconut cream instead would also produce a nice mousse. I can’t vouch for this, as I haven’t tried it yet myself, so if you do try it please comment below and tell me how it went!
Another tip: if you’re using a stick blender make sure you put the cocoa and ground almonds in the bowl UNDER the cream. Otherwise when you will likely get covered in a fine shower of cocoa when you start blending!! Learn from my mistakes…